Tuesday, December 3, 2013

Anthropologie Knock-Off Snowflake Wreath


Courtesy of the blog, Between You & Me comes an easy-peasy Christmas wreath tutorial.Not only is it cheap, the wreath itself is a replica of a $298 dollar piece from my all time favorite store, Anthropologie. The supplies needed include: a straw or foam wreath, white yarn, push pins and Christmas-y colored ribbon!
The directions are extremley easy to follow and the most time-consuming bit of this project is creating the pom poms. Enjoy! Directions for the wreath are here!

Saturday, October 19, 2013

DIY Wool "Socks"

Hello dear and wonderful readers!

Here is the 2nd edition to our video DIY series (though indeed long overdue). Stay tuned for more updates and tutorials coming your way!

xo Jen


Sunday, September 22, 2013

From Flab to Fab! Pumpkin Style.

Sorry for the lack of posts, dear readers. Jen and I have been extremely busy with college work and have been swamped since day one. However, we're going to make time for fall because it's our favorite season and there is an abundance of tutorials for things we would love to try and share with all of you.

Here's a really quick tutorial my dad showed me recently to turn those cute, but dull and dirty pumpkins you picked from the patch into a vibrant and festive fall decoration. 

Fresh from 'da patch:


 Directions:
Wash your pumpkin (I used the kitchen sink!) with warm water, soap and the soft side of a sponge. Scrub all the dirt from the pumpkin and pat dry. Take a dollop of olive oil on a paper towel or cotton ball and rub it all over the pumpkin. Make sure to use a small amount of oil, because a little can go a long way!

Now look at these beauties!


Friday, June 14, 2013

DIY Flower Crown


Our first DIY video tutorial! Yay! Enjoy!

Britt's Birthday Gifts...DIY Style!

After spending fifteen birthdays together, I knew that Britt's 20th birthday was a big one. I wanted to give her something special that included all of our shared interests like crafting and thrifting. Below you'll find two gift ideas perfect for the holiday season or birthdays for a friend or loved one.

Antique Skeleton Key Necklace


Aquire an antique skeleton key from an antique store, flea market or laying around the house like mine was. Paint it with your choice of color nail polish. Allow to dry and possibly add multiple coats. Simply loop a chain or ribbon through the opening at the top of the key and voila!


Chalkboard Picture Frame

All you need is an old picture frame with the glass still in it and chalkboard paint! Remove the glass from the frame and paint in one direction for the base layer. For any additional layers, paint in the opposite direction, this will create a smooth look. Allow to dry between each layer and paint as many layers as necessary until completely black. Put the glass back in the frame and you have yourself your own personal chalkboard!

Wednesday, June 12, 2013

2 for $20!


Two great finds today at Urban Outfitters! I had the luck of tracking both of these items down for you on their website!

Shirt : Sparkle & Fade Ombre Boyfriend Tee in blue $9.99 
Scarf: Textured Crosshatch Eternity Scarf in white $14.99
 **(the scarf had an additional $5.00 taken off in store, so it was $9.99)


Sunday, June 2, 2013

Scrumptious Banana Pops

Happy June everyone!!

I hope you're welcoming the change of seasons (if you have season changes that is) in a great way! I know I have been by staying inside in air conditioning.

Ha. Ha. But really, I have been working towards becoming more confident in myself physically and trimming down. Since it has been deathly hot the past couple of weeks in the North eastern U.S. of A, I have begun working an hour of pilates every day. Whew talk about a work out! While I may be cursing and sweating and dying during those 60 minutes, at the end I feel good about myself, and a couple of people have told me I'm beginning to look slimmer.

Where can I find such pilates videos that work my WHOLE body you may ask? Cassie Ho, a pilates instructor and head of Blogilates posts blog work out videos on Youtube. Check out her blog here!

Anyway, so the true point of this post I suppose is to give you a healthy and easy snack to prepare for yourself. Banana pops are indeed healthy, cheap, and a great staple during the hot summer months. Wanna make this delicious treat? Check it out below!

Materials: 
-10-20 oz. Bag of Dark Chocolate Chips (dark chocolate is the healthiest!)
-3-4 bananas (I ended up using 4 bananas which makes 8 banana pops)
-Popsicle sticks

Peel bananas then cut them in half. Take your popsicle stick and stick them straight through the base of the banana. Once you've done this, place your bananas on a cookie sheet with either parchment/freezer paper or tin foil. Let chill in freezer for at least 15 mins.

While your bananas are chilling, put bag of chocolate chips into a microwave-friendly bowl. Microwave on high for at least 40 seconds, stirring the chocolate so it is nice and smooth. You may need to put it back in the microwave a few times to melt the chips fully. 
After 15 mins, take your bananas out and dip in the chocolate! Allow excess chocolate to drip in the bowl, then place banana back on your cookie sheet.
Put bananas in the freezer until the chocolate is nice and crisp on the banana. 

Enjoy!!

--Jen


Friday, May 24, 2013

Summer Inspiration


Ever since I landed myself a summer job, the idea of traveling has been a constant thought in my mind. Seeing the world has been one of my life goals ever since I visited France last spring. For people who have never traveled out of the country, I will summarize the experience by saying that seeing other cultures and places first hand will educate you in ways a classroom never could. Now my journal has a huge list of places I must see, a bucket list of sorts.

This quote is the inspiration for me to reach every one of those destinations, but it can apply to any sort of goal you want to achieve this summer and are having a little trouble with motivation.

“Make a radical change in your lifestyle and begin to boldly do things which you may previously never have thought of doing, or been too hesitant to attempt. So many people live within unhappy circumstances and yet will not take the initiative to change their situation because they are conditioned to a life of security, conformity, and conservation, all of which may appear to give one peace of mind, but in reality nothing is more damaging to the adventurous spirit within a man than a secure future. The very basic core of a man’s living spirit is his passion for adventure. The joy of life comes from our encounters with new experiences, and hence there is no greater joy than to have an endlessly changing horizon, for each day to have a new and different sun. If you want to get more out of life, you must lose your inclination for monotonous security and adopt a helter-skelter style of life that will at first appear to you to be crazy. But once you become accustomed to such a life you will see its full meaning and its incredible beauty.”

- John Krakauer, Into the Wild

Monday, May 20, 2013

DIY Antique Wood Sign

Hey all, Jen here! Sorry for the huge delay in my promised DIY blog post. Finals week was pretty crazy, but now that we're both on summer vacation, blog posts should be more frequent!

Here is an easy tutorial on how to create your very own "antique" wooden sign that you can either give as a gift or mount around your house for an extra "oomph". Original idea found from Diddle Dumpling with just a few variations of my own. Let's get started!

Materials: 
-Wooden board (size is entirely up to you! You can find these laying around like I did, or go to your local hardware store like Home Depot & see if they will give you any scrap wood from their lumber section)
-Container of water
-Black Acrylic paint
-Large bristle paint brush
-Paint brushes of varying styles (optional)
-Printed out text you wish to have on your sign

1)
Pick out your desired font and text on a Word document. I recommend sticking to one or two words; a whole sentence can get quite muddled. PRINT OUT SO THE FONT COMES OUT BACKWARDS. This is key when transferring the text to the wood. There should be a mirror option to select before you print.

Want cool fonts like this one? Visit www.dafont.com for FREE downloadable fonts! A huge huge selection.


2) 
Here's the fun part: distress your wooden board! If you want that antique look, take a hammer and some nails, and bang away. This board was already darker in color so I sanded it up with some sand paper and hammered in some holes and nails to get the worn look I wanted.
3)
Place paper on the wood so the ink side is face down
4) 
Using your bristle brush, wet the paper where the text is. Be sure not to soak it too much, otherwise holes will form in the paper and the ink will not be able to transfer to the wood. 
5) 
Get a sharpie marker and use the rounded head end to rub horizontally/vertically over the text. This helps transfer the ink. Do not press too hard  or rub a spot repeatedly.  This will cause the paper to tear and we don't want that! Going over the text area once should do the trick; make sure you indeed rub ALL of the text.
6) 
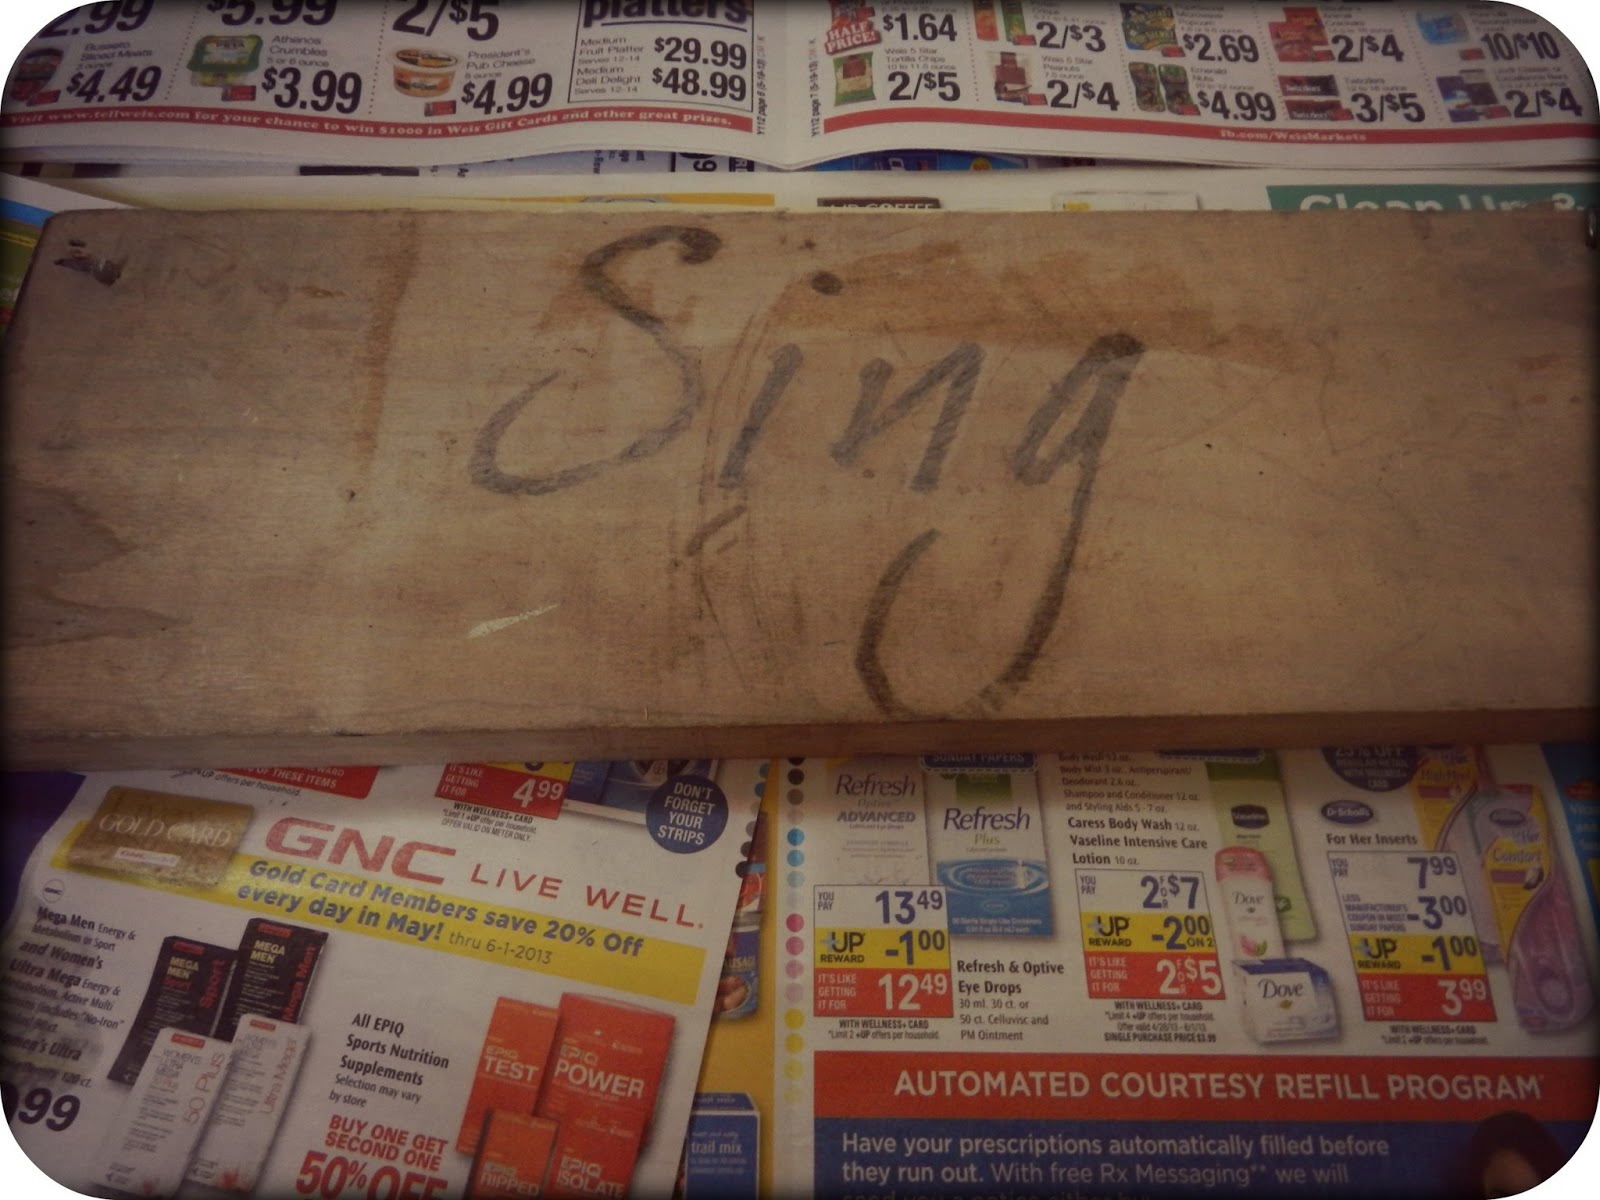
Once you remove the paper, it should look something like this; it may be darker or it may be lighter for you. You can either leave it like that if you like the faded look, but I wanted it to be darker so I decided to fill it in with the acrylic paint.
If your font is thinner like mine, use a smaller brush. Here I am using a thin angled brush from Crayola. Let it dry for about an hour.
7) 
Distress distress distress! (If you want). I wanted it to look more faded so I took a 100 grit sand paper and brushed it all over the word to roughen it up. Even then I still wasn't satisfied so I scratched at it with a nail, rougher sand paper, then used some grey paint I found in my dad's workshop I loosely brushed on the wood. 


The finished product! The sign on the left I made awhile ago using the same process. The sign used in this tutorial I am giving as a gift to my vocal teacher. 

Have fun and if you have any questions/difficulty, comment! 

--Jen


Monday, May 13, 2013

Momma Missy's Meatloaf


 In honor of my mom for a belated Mother's Day post, here is how Missy makes her meatloaf! This stuff is delicious and needless to say, I never eat it from anywhere else besides our kitchen.
Ingredients:
3 pounds of ground pork/veal/beef mixture

1 egg

2 slices of bread

½ of a small onion, chopped

1/3 cup of Italian bread crumbs

½ can of tomato soup

1/4th cup of milk

1 Tablespoon of parsley

½ Teaspoon of garlic salt

Sprinkle of Worcestershire sauce

Salt & Pepper


Directions:
 In a medium size bowl, tear the slices of bread into pieces. Pour the milk overtop. Let sit for ten minutes until the milk is absorbed by the bread. Following this, add the rest of the ingredients (in no certain order) into the bowl and mix thoroughly with your hands. When well blended, form the meat mixture into a loaf and put in a ungreased pan. Top with ketchup and allow it to bake at 350 degrees for a half an hour.

Take the loaf out and top with the remaining half of the can of tomato soup and continue to bake for another half an hour.


Enjoy!

Monday, May 6, 2013

Viva La Nature

Today Jen & I went on a hike in a local county park to de-stress and get some fresh air before our finals begin. We were blessed with this pretty lake view the entire time.

Just a reminder to stop and enjoy the little things! You're never that busy.


Sunday, April 28, 2013

Painted Leather Bracelet Tutorial via ABeautifulMess.com


 The tutorial for this craft can be found here at the amazing blog, A Beautiful Mess! I decided to give this a whirl because my mom absolutely loves leather bracelets and this would be the perfect homemade gift for her for Mother's Day.

 Today, I cut the strips of bracelet from the leather scrap(thanks to A.C. Moore)and painted a few designs on them. I have yet to add the snaps onto the bracelet to complete it, but I'm pretty pleased with the results!

Saturday, April 27, 2013

Giveaway #2; Ouija Board Pendant Necklace!

Firstly, congrats to last week's winner, Rena B! We'll be contacting you to get your information so we can send your necklace! (:

This week's giveaway is something kinda spooky I picked up from a local crafter in Baltimore, Maryland on a family trip one spring. It is a double sided pendant on a silver chain.


I was originally attracted to this necklace because my family has a big interest in horror movies and the paranormal.  While I refuse to go near or use a Ouijia board, I couldn't deny that this was a bold, eccentric piece for anybody trying to make a statement.


In order to win this necklace, please answer the posed question below and remember to tell us your name and leave your email!


This week's question is, "If you could snap your fingers and appear somewhere else, where would you be an why?"


A winner will be chosen in two weeks on May 11th, 2013.

Friday, April 26, 2013

Websites that totally don't get enough attention from you....

Okay, let's admit it, we probably all spend a little more time online then we should. And we're constantly cruising the web, adoring websites, despising websites and stumbling across ones we maybe haven't yet formed an opinion on.

Here's a few diamonds in the rough that I highly believe others will enjoy just as much as I do...

1) TasteKid.com
Have a favorite band and want to find similar sounds out there? Type in the artist in the 'music' search bar and find exactly that. TasteKid finds stuff you would enjoy based on the things you already love. Using this website, you can find similar music, movies, shows, books, authors and games to the one you've already tried and approved of.
 2) HeyItsFree.Net
Okay, this website is amazing. Members post freebies from all around the web, some full size and some trial size. Usually, all you have to do is click a link to get to the product's website and enter your information (mailing address) and in a mere 6-8 weeks you get a free sample of a quality product. I've gotten adorable makeup bags from Target stuffed with travel sizes of tons of name brand cosmetic products and a huge coupon book. I've also received a manufacturer's coupon for any full size Pantene product as well as a nice leather journal. Finally, HeyItsFree.net compiled a list of places you can go in on your birthday or even a few weeks to a month before and receive free gifts or food items.
3) Wanelo.com
The last website I put on the list is a lifesave for all my fellow Tumblr users out there, but this does not mean it's limited to just them! Anyone can go onto Wanelo.com and search for a piece of clothing, decor, etc they desire to have. The absolute cutest pictures of items come up and upon clicking on them, you're directed to the place to buy the item. The reason I relate this website to Tumblr is because often on your dashboard a piece of adorable clothing pops up, but that's all you get. No brand, no site to buy, nada. With Wanelo.com, you just simply type in a description of that item and odds are, your dream piece will be available to you!

Happy Browsing!

Monday, April 22, 2013

DIY Braided Bun

Hey, Jen here!

If you're anything like me, you tend to like to sleep in on those school/work days as long as possible, but then you kind of lose track of time and then what do you know, it's time to leave. Here's a simple hair style that literally takes only a few minutes and it can be either casual or a little more formal.


Materials:
-Regular hair tie
-2 small rubber hair elastics (you can find these at any beauty or drug store)
-Bobby pins
-Headband, ribbon, flower, bow, or other accessory (optional)

1.  
Brush out your hair so it's tangle free then put it in a pony tail. The height of your pony tail will depend entirely on how high you want the bun to be on your head; I like 'em high, but in this tutorial it is not as high as I normally like it.
2.
Divide the pony tail into two even sections
3.
Braid one half into a normal braid, then repeat on the other half of the pony tail that you made.
It'll look like this...stylish huh? ;p
4.
Start by wrapping one braid around in a circle or donut shape - it doesn't matter which braid you start with. I just happened to start with my left. Once you have it wrapped around, pin down the ends, sticking the bobby pins in towards the bun; this keeps them hidden. 

5.
Here is where you can play around with it to find what you like. Take the other half of the braid and wrap it around the one you just pinned into place; you can either wrap it around from the top or the bottom. Again, pin the ends of the hair down, and voila! You're done.

Now you have a pretty intricate looking bun that was a cinch!


How To; Craft Your Own Earring Holder

Jewelry organizers are not only an effective way to store your precious little gems, they're also super cute! I've found that my necklace holder is one of the most precious elements of my bedroom. However, since I've taken the gages out of my ears and can now wear my regular earrings again I needed a place to hang them! Using an old picture frame, I hot-glued three strips of lace ribbon to the back of the frame and BAM! Had the cutest little earring holder/display.


Happy Earth Day, Everyone!

In honor of Earth Day 2013 and Mother Earth herself, I figured I'd post about something small everyone can do to help keep her clean. Thus,
Composting 101.

Even if you don't have a green thumb and like to garden, composting is still a great option to keep excess waste from your trash bags (About 30%!) and ultimately, taking up space in a landfill. Some folks are really into it and buy special bins to let their waste decompose, but I've developed a really simple and quick way to go about it.

Get a simple garden pot, it can be clay or plastic and even be recycled from last year's plants. Fill it with a little soil and a little bit of green grass.

As you use the following items in your home, add them to the pot:
  • Fruit & vegetable scraps
  • Newspaper & cardboard shreds 
  • Egg shells
  •  Coffee grounds & tea bags
When you add the items to the pot, make sure you stir it occasionally (2 or 3 times a week). You can leave your compost outside in the sun or inside a garden shed or closet. If you chose to leave it outside, make sure it is under some sort of cover to prevent rain water from flooding the pot.

The compost will be ready to use when all of the items in the mixture are decomposed and the soil looks like the sort you'd buy, no lumps or pieces of old fruit or veggies! By this point, the compost will be ready to host plants in new pots or be put in the ground to grow plants. Depending on the amount of care, your compost mixture could turn to soil in a matter of months!


Happy Growing<3

Sunday, April 21, 2013

Get the Look!


Spring is here! As the flowers bloom, so should your wardrobe! We put this outfit together yesterday and fell in love because of it's simplicity and beauty. Both items can be purchased at Forever 21.


We paired the outfit with a pair of brown boots, but sandals could work just as well (:  


Saturday, April 20, 2013

Giveaway #1; Stag Necklace


Often times while making times in our closet or drawers for new accessories, we stumble across items barely worn since we bought them. Instead of letting them collect dust, we decided to recycle them to someone who will appreciate them a little more then we do. Hence, a giveaway!

Here's How It Goes: leave a reply in the form of a comment below to a question we ask for that particular give away. Remember to leave your email, because if you win we need to get in contact with you! We'll choose a winner in exactly one week (Saturday, April 27th).

This week's giveaway is a faux gold stag head pendant on a leather 
cord.


This week's question is, "Name a particular moment that changed who you were, either for the better or worse."

Thanks & Good luck!

Friday, April 19, 2013


“I dearly love a laugh... I hope I never ridicule what is wise or good. Follies and nonsense, whims and inconsistencies do divert me, I own, and I laugh at them whenever I can.” 
(Jane Austen, Pride and Prejudice)

I often find myself wishing I was the strong and outspoken Lizzie Bennet.

Thursday, April 18, 2013

How to Make Your Hair Grow Faster On A Budget


Don't we all wish we could have long, beautiful, healthy hair like my co-blogger Jen?!

In seventh grade I made the decision to cut off my waist length hair and donate it to ‘Locks of Love’ to make a wig for cancer patients. This was once of my happiest and most self-fulfilling moments! I highly encourage other people, gals and guys alike to contribute to the cause. Ever since then I have been constantly at war with myself about how long my hair should be. One month it'd say, “I’m growing my hair long again!” Until a few months later, when I decided I would look much better with short hair, cut off the hair I had worked to grow and thus, the cycle repeated. However, now I’ve been at growing out my chin-length hair since November and because of a ton of research and religious care routines, my locks are already past my shoulders. Want to know my secret? Sure! How about my secret on a budget? Double Sure, lets go!

1. At least 8 glasses of water a day to hydrate. Believe it or not, this was the hardest thing for me to do because I am not used to drinking many fluids daily. I use the simple rule of thumb, during your day if you do not have a bottle or glass of water within reaching distance, go find some! 
2. Wash your hair less. Try every other day to start, it’s recommended that you only wash your hair a few times in a week (3 or 4) to keep it healthy.
 3. Buy shampoo and conditioner without ‘sulfate’ listed in the ingredients. Sulfate is the chemical in the product that strips the oil from your hair and damages it. What I’ve found is that cheap shampoos contain sulfate and expensive, salon shampoos do not. Luckily, I’ve done some researching to find a happy medium, aka, products under $10.00!  
·         Any of the Burts Bees line of S&C

·         Any of the Organixs line of S&C

·         Aveeno Pure Renewal S&C

·         L’oreal Everstrong  S&C
 4. Reduce the amount of heat you put on your hair with blow dryers, curling irons and straighteners. If you must use heat, always use a heat protector product, less the $5.00
 5. Use a leave in conditioner and a split end protector. I like Aussie’s Hair Insurance leave in conditioner and split end protector, also less then $5.00 a piece. 
6.  Take a Biotin vitamin. This is the main ingredient in Hair, Skin and Nail vitamins. It makes all of these things healthy and strong. I take 1000mcg a day. Most drug stores have these for under $5.00 as well. Just remember, this makes ALL of the hair on your body grow...so you may want to invest in extra razors ;)
 7. Get your ends trimmed when you notice split ends. It’s possible that even with protection, the ends of your hair will split. When you notice the little white tips on the ends of your hair, get them chopped off! If you don’t, the ends will continue to split until they break off because they are weak. Most hairdressers will do this for under $10.00.

Finally, hair grows around 1/2 inch a month. This may be faster or slower for some people. However, the better you treat your hair the healthier it will be and longer it will grow.

Good luck & happy growing!


The Truth About Exercise

Let me first start out by saying this:

Ladies, your body is perfect just the way it is. I don’t care what size you are. Size 0 or size 18, you’re amazingly beautiful and this has nothing to do with the way you look. Trust me, and above all, do not let anyone tell you that your body is not pretty and that you should change it.

However, if YOU are unhappy with YOU, then I’m here to help. And by the way, being unhappy with yourself does not just mean with your appearance. In February. I started a fitness kick because I was unhappy in my life with a huge variety of aspects and now in mid-April I feel so much better then I have in a very long time.

So lets get down to it.
 1.The issue of working out is a tricky one. It can be extremely confusing and at times severely frustrating. But, the first thing to address is making time for it. Start with any period of free time you have in the day. If you have a lot, YAY! If you have ten minutes, still YAY! No matter what, you’re working that body out more then you were before and this is already a huge accomplishment. You can use your free time to work out as many days a week as you’d like. Generally, I see people exercising five days a week, but obviously, some people don’t have that kind of leisure. So, just work it in when you can and your body will be throwing a huge huge thank you party.

 2.At first, it may be difficult to find routines that are easy for your body and muscles to handle because you’ve just started out. Walk. WalkWalkWalkWalk. The great thing about walking is you can literally do it anywhere. Around your neighborhood, through your house (yes, try up and down the stairs several times!), alternative routes to work, by taking the stairs instead of the elevator and any other place you decide to get creative. Walking, especially in long distances, will prepare your body for the future activity if you so decide to venture into harder work outs. If you don’t decide to do any more then walking, you’re by no means lazy. It’s been proven that walking briskly for twenty minutes a day can decrease your risk of diabetes, heart attack, having a stroke and an early death. Now I don’t see anything lazy about that! Brisk walking and running are great because they do not target a single area of your body, all of it will become toned and thinner.
  • ·If you do decide to up your waking, try 4 minutes walking, 1 minute running repeatedly until the end of your work out and your body will gradually get used to moving at a fast pace.
3. Perseverance. If your goal is to lose weight, normally, it takes about three months for someone to see changes in their own body when they start becoming physically active. Others will notice this before you. But I will tell you, three months is a very long time when you're playing the waiting game. You will get tired of seeing yourself appear the same before the mirror and upset with your body when it still quite can't keep up with the work out you desire to do. Stick to it, because ladies, by getting up and allowing yourself a short period of exercise in the day, you're doing so much more for yourself then people sitting on their bums all day picking out the nonexistent flaws of others.

Have I convinced you to start your fitness journey yet? I'll leave you with a few more points...
  • Exercise truly makes you happier. Physical activity causes endorphins to be released in your body. This chemical minimizes your perception of pain, and therefore reduces stress, anxiety and depression.
    • The next couple months will pass regardless of what you chose to do with the time, why not do yourself a favor and make yourself happy?   

Good-bye hurt!


Did you ever find that one quote that really puts everything you are feeling into just a few lines? I'd have to say this would be it for me. The idea of replacement, of being inferior to others is something we all encounter, at any point in our lives. For me, and for so many other people, this feeling of inferiority stems from own personal body issues - the way I see myself. Often times I see some really attractive guys at school, but then I see another girl and I can't help but think he would probably be way more interested in her because she is super gorgeous and super pretty and super everything I'm not - or so I tell myself when I'm feeling  inferior. 

The problem is with human nature, we're so ready to come down on ourselves for every little thing, am I right? Anything we do that is "bad" or "not good enough" we immediately blame ourselves and ask what is wrong with ourselves. No positive thinking there. Now I am one to preach, I'm quite the self-negative thinker, but I'm really trying to change that. My goal is to become more confident! I think we all need a little bit of that from time to time.

So, from one girl who is struggling with her own self-image to perhaps someone else who is also, let's make a little pact, shall we?

We will:
1. Not be so hard on ourselves (really hard to do, but if those thoughts start creeping in there, say 'Nope, I will not think like this') and maybe distract yourself; go for a run. Do something that makes you happy!

2. Look at yourself in the mirror and say I am good enough and I have a lot to offer the world. (So it's his loss in my case!)

3. Find things that are good about yourself. We've all got 'em. Doesn't have to be physical or constant. Maybe you're having a really awesome hair day!

4. Do this at least once a day.

I know it'll be a struggle, but I am so game to try because nothing good is coming out from these feelings besides a whole lot of sadness and hurt. Will you?